After my last post about pattern drafting I got so many great comments about the various programs you use, whether as a hobby or professionally. This subject definitely brings the patternmakers out of the woodwork! That makes me happy because I love patternmaking minds. I want to put you all in a room together so we can geek out on subjects like bone structure, sleeve caps, and pattern puzzles.
Today as promised I’d like to share a few of my favorite Illustrator tools for drafting patterns. Now just to warn you, I am not writing a tutorial on “how to draft in Illustrator”, nor am I trying to exhaust the subject. I’m also assuming that you are a hobbyist drafting for yourself. If you are interested in making sewing patterns for sale, there are many issues to consider and these are worthy of a tutorial series or course on their own. I’ve included some resources at bottom if this is your interest.
So let’s dig in…
Learning the Pen and Line Tools
If you are brand new to using vector software of any type, I recommend spending some time playing with the pen tool. This is the most basic tool and when drafting you’ll use it over and over again. You’ll also use the Line tool, which allows you to draw straight lines and transform them into curved ones later on.
When I first started using Illustrator I created documents and made a bunch of random shapes freehand with the pen. Play around with it until you get used to the motions with your mouse or trackpad.
Get to Know Anchor Points
Anchor points are little dots that “anchor” a line or curve into a particular spot. These points have handles that can be pulled out to create curves. The more anchors the more complex a curve can get.
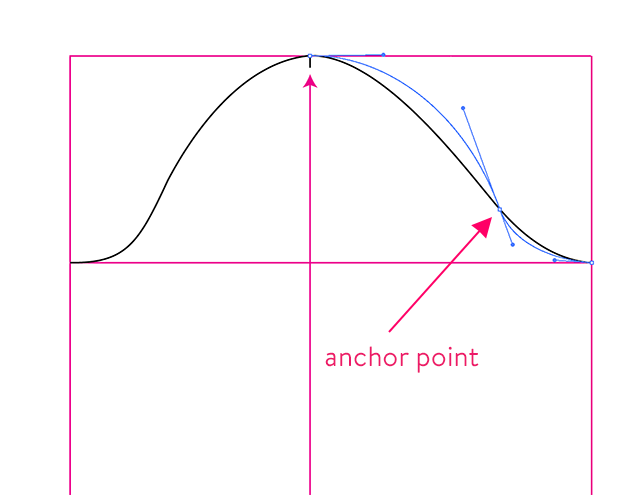
You can add anchor points to any line by clicking on the “Add Anchor” tool (the shortcut in Illustrator is the + key).
Measuring Lines
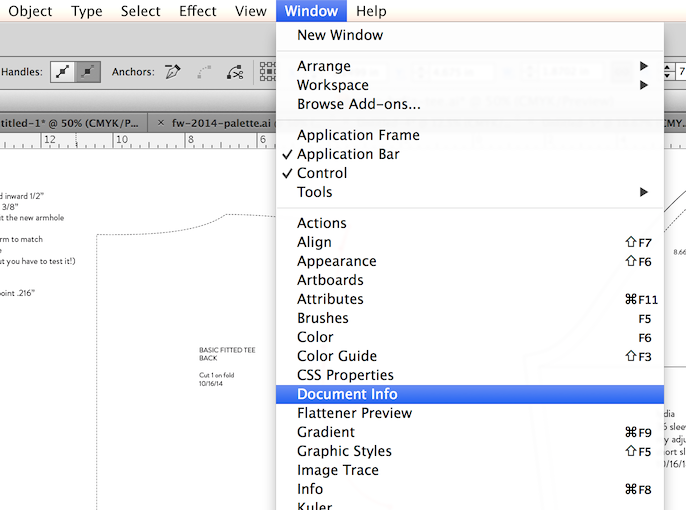
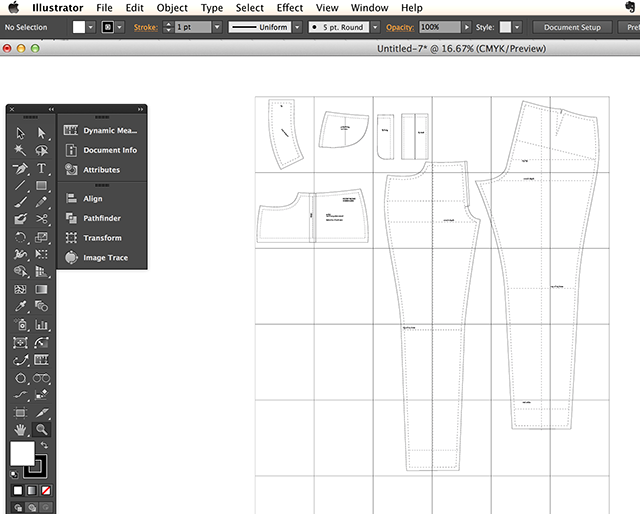
There are two ways I measure lines. The simplest is through the “Document Info” window.
For example, let’s say I want to measure an armscye. First I select the armscye line with the “Direct Selection” tool (shortcut: “A” key). Then I look in the Document Info window. If this is not visible, click on “Window > Show Document Info”.
The Document Info window has an additional dropdown menu for “Objects”.
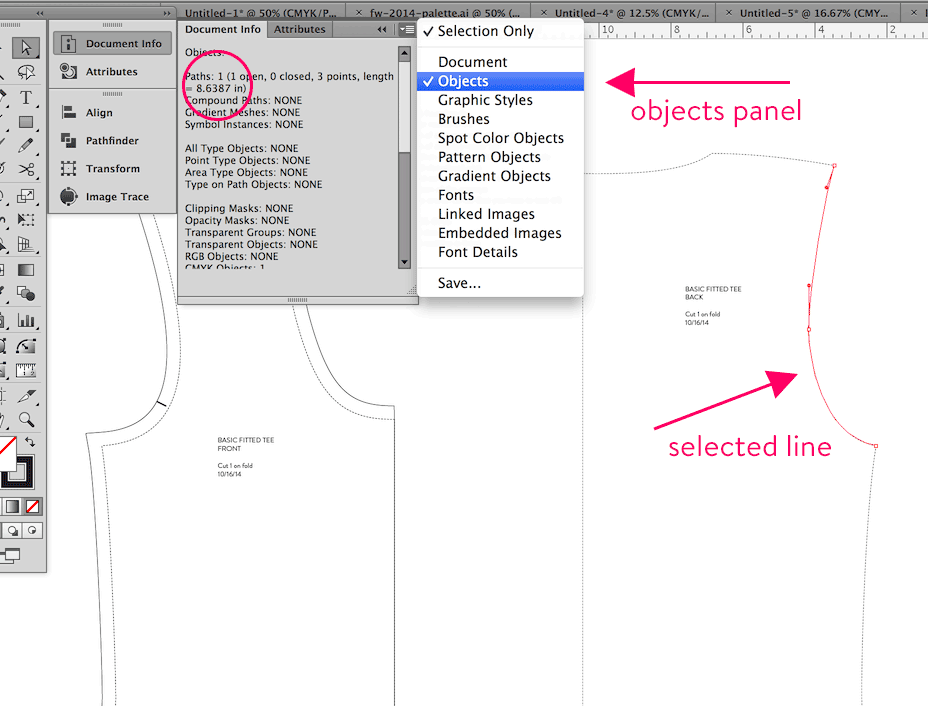
When a line is selected, this information window will give you an exact measurement of your line down to fractions of inches, millimeters or centimeters.
The second tool I use for measuring lines is a plugin called Vector Scribe. Years ago this plugin was called SnapMeasure. It cost a mere $10 or so. Unfortunately another company bought it out, repackaged and amped the price but I’ve gotten so used to the tool that I had to bite the bullet once I upgraded Illustrator.
Vector Scribe allows you to measure segments of curves and lines, rather an an entire line. So for example, I can measure just the front part of a sleeve cap:
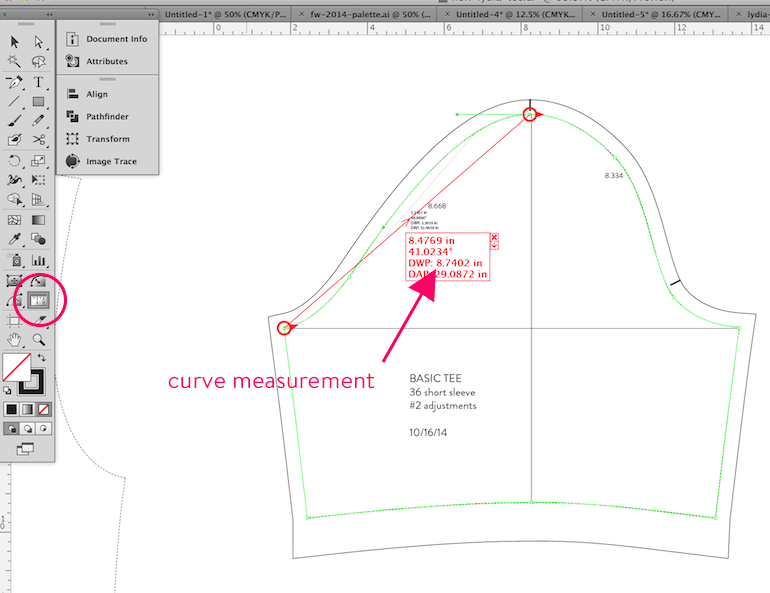
(DWP means “Distance Within Points”, which is the actual curve measurement along that red line.)
This plugin makes tasks like walking and checking notch placements on my bra patterns so much easier!
Using Guides
Guides are non-printing lines that you can pull into your document. Most Adobe software use guides in some form and they are really helpful for lining pieces up, finding exact corners, or maintaining a control point.
In Illustrator, to pull a guide your rulers have to be visible and you simply click on the ruler and drag downward or inward and a guide appears:
For example, on this sleeve pattern, I pulled in guides to mark the bicep line and the shoulder notch position. I locked the guides (View > Guides > Lock Guides) so they would not move while I was drafting and moving the sleeve seams around.
Duplicating Objects and Layers
Now here is the real beauty of Illustrator—the ability to copy over and over without losing previous work. Illustrator uses layers just like Photoshop.
If I draft something in one layer but need to make an adjustment, I just duplicate the layer. I’ll make the adjustments on the new layer and then go back and make the original layer visible so I can view and assess the changes.
Printing
Unless you are lucky to have a wide-format printer or want to take your patterns to the copy shop, you’ll have to print tiled patterns and tape together just like any pdf sewing pattern! Here is the template I use for all my patterns:
Illustrator has a feature called Artboards, which are hidden in the background and create printing boundaries. In my template I created a 7″x9″ printable rectangle for for every page, then an Artboard that covers each rectangle. Explaining Artboards would take up a post in itself so I’ll leave that to you to explore.
Seam Allowances
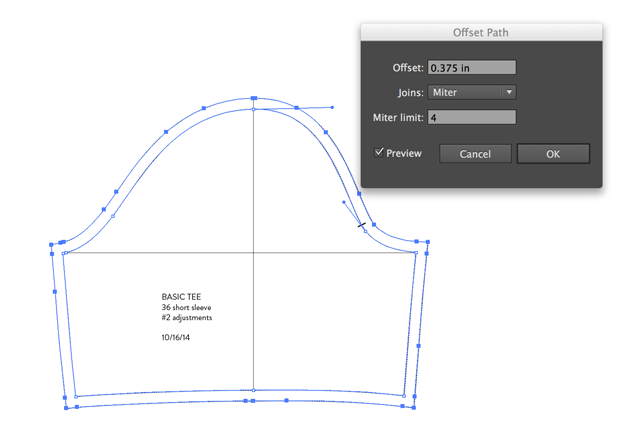
There are several methods of creating seam allowances. “Offset Path” is the easiest but all your paths have to be closed. Select your path, then go to Object > Path > Offset Path. Enter the seam you want in decimals:
I also use a an Action that I made up to create bra seam allowances (very curvy seams need special seam allowance treament!). I’m not going to share it because honestly it is a totally hacky workaround and would take me too long to explain!
Further tips:
- Keep your lines or strokes under 1 pt (point). I use .5 pt lines. Think of the difference between a sharp pencil and a sharpie marker—if you get thicker than 1 pt you are making your seam line almost a part of the seam allowance.
- Use the text tool to write notes on your pattern with the date and any adjustments you make. I can’t tell you how many times I used to make multiple versions of a pattern and couldn’t remember which was the most recent! Now I have a practice of putting dates on everything.
- Learn some shortcuts! There is a shortcut key for everything in Illustrator. The Pen Tool is P, Select Tool is A, and so on. When you start using one tool over and over there is a good chance it has a keyboard shortcut. You can actually make your own (go to Edit – Keyboard Shortcuts), and it will save you time from dragging your mouse over and over again.
Further Resources
- Dixie wrote a series on Starting an Indie Pattern Company with tips on drafting, grading and selling. Parts One and Two.
- Ralph Pink video tutorial series on drafting in Illustrator
- Melissa of Melly Sews offers two courses on CourseCraft: Creating PDF Sewing Patterns and Pattern Grading
- Pattern Workshop: Creating PDF Patterns from Sketch to Scale
(Please note: I am not affiliated with the courses nor have I taken them.)
Is there something you’d like to know how to do in Illustrator? I tried to think of the basics here, but if you have a question feel free to ask!
Would you like tips and inspiration in the craft of lingerie sewing? Sign up for my weekly eletter The Lingerie Maker.
Thank you so much for this post! I’ve been spending way too long doing seam allowances it seems and I thought I was doing it a quick way!
Thanks Marilla! You can even create actions out of the offset path command for various seam allowances. Once your record them, all you have to do is press a button and voila!
Great post Amy! I’ve been thinking for a while I should post some Inkscape tips for pattern drafting, and you’ve inspired me to finally do it. A lot of the Inkscape commands are very similar to what you show in Illustrator. For anyone wants to try pattern drafting in Inkscape (the free alternative to Illustrator) here are some tips to get you started: http://growyourownclothes.com/2014/10/30/tips-for-pattern-drafting-with-inkscape/
I’m sure lots of people want to know how to replicate these things in Inkscape!
thank you so much. I wanted to draw in illustrator but didn’t know how to measure curves. You really made my day. 🙂
Thank you so much for this! I kind of know the pen tool and other stuff, but I’ve always wondered about measuring the lines and adding seam allowances! This is so helpful! I hope you do more posts on this in the future if you feel so inspired.
Thanks Amanda! I’ve been wanting to write about pattern drafting for a long time and I’m so glad it was useful for you. I do plan on posting more…
For all users—or potential users— of the wonderful VectorScribe plugin for Illustrator, it includes another quick way to get the lengths of lines, as well as to easily extend them exactly. It’s the Extend Path Tool, demoed here:
http://www.astutegraphics.com/extend-path-tool-keyboard-shortcuts/
Whenever you click on an end-point with the tool, the cursor instantly shows the line length in your preferred units. I’ll often clip pattern outlines at all corners just so I can use this tool to quickly measure everything. Or of course to extend them by some precise amount, since the read-out is continuous.
I wish I knew some way in Illustrator of bending or shaping lines WITHOUT changing their length. That would so often be handy!
I second that–I don’t know what I’d do without that tool.
Geeky Tip: Been doing a LOT of pattern work with Illustrator lately (prepping the online patterns that will come with my new book), and have found a neat little add-on script that I’m using a lot. It comes with a ton of other scripts that are all pretty interesting in a general digital drawing way, and some actually useful for precise pattern-making sorts of things.
Read about using/installing scripts here; very easy:
http://www.astutegraphics.com/30-must-free-illustrator-scripts/
Find the ones I’m referring to here:
http://shanfan.github.io/Illustrator-Scripts-Archive/
The one I’m using most is Reverse, which changes the direction of a path, which once you run into that as a problem is very handy to be able to do (if you don’t know why you’d want that, relax, you don’t yet!). The other is Path Length, which measures your path and prints its length in mm, so it’s a free alternative to the VectorScribe options mentioned above. I just installed them all (I’m using CC 2014—they take up no room) and will explore them once I get some leisure.
Hi David, sorry your comment didn’t publish sooner. (Comments go to my “moderate” area if they have more than one link.)
They sound like some good tools to explore!
how would you go about grading patterns using illustrator?
Hi Letita, I grade the same way one might grade on paper. If you’re new to grading I’d definitely recommend a grading book to understand the basics. With Illustrator, grading is easier than doing it on paper, since you can reproduce lines/shapes instantaneously.
At the bottom of this post I mentioned a couple of e-courses. I think one of them covers various tools you can use to grade in Illustrator. I use different methods myself and it depends on whether I’m grading a stretch pattern or a non-stretch one.
Hi Amy,
I’ve been working on a side project that I hope could help with the drawing part. It’s a free online app Sartology.
It’s basically a pen tool (similar to Adobe Illustrator) with measurements, so you can decide what the lengths of the lines you draw while drawing them (unlike Illustrator where you can measure afterwards). You can export what you’ve drawn to SVG file that you can later open in Illustrator or Inkscape.
It’s not yet a full CAD system but a good start for pattern makers who need to draw patterns from scratch.
It works on the browser so you can work on a pc or a mc or your iPad (works with touch).
Hi Michal,
Thanks for sharing your new project with my readers! Looks promising. It’s great that there are new tools for drawing and especially those that export to svg.
Amy
(I edited your comment because I don’t publish promotional links in comments, but readers can find their way through your avatar link.)
Amy,
Thanks for taking the time to write and post this. Your tips are exactly what I was looking for to help with the pattern drafting process. Keep up the good work!
Hi .. I know this is an old post .. but I want to ask you .. I’m great with illustrator and above professional with Photoshop and I want to turn my pattern making process into a digital form. The thing that this will be my business, I will be making different models and different sizes of the same pattern. So, does it worth to give Modaris v6r1 -which I really strongly truly hate- another chance or should I just save my time and benefit form my illustrator skills? I compared Lectra to Autocad that my husband has used and I found it too basic and too hard to deal with and get used to. what do you think?
First of all… Great post! Very friendly and touches on a lot of topics with out too much info over load.
I found this looking around for some symbol libraries that would be handy for pattern drafting but it doesn’t look like anyone has been making such a thing. Or maybe just not sharing that they have.
Worth looking at if you haven’t ever really used the symbols in illustrator. I’m going to make a few of the things that you tend to use over and over again. Like the cut on fold indicator or instruction items that you use over and over like ” cut two”. Doesn’t make much sense to keep manually making things like this if you can just make it a symbol and pull it on to your art any time you need it. 🙂 Just another idea to float out there.
Hi Kristen,
Symbols are great! I use them for dots and notches. You are so right in that there is no reason to do anything over and over. For any action you do repeatedly in Illustrator there is always a solution!
For something like the “cut-on-fold” indicator, I would create a symbol for the arrow or dot, but for any text I just copy and paste over and over.
It’s just as quick as dragging a symbol. When you create a symbol from text, it changes the text into a vector graphic. I personally don’t prefer that as it makes it impossible to edit the text or change the weight or font later on. I also make big use of graphic styles. For example, I keep my grainline arrow as a graphic style. If it was a symbol I wouldn’t be able to change its length for a specific pattern piece, but with a graphic style I can.
Can you tell I love Illustrator? 🙂
Ah a girl after my own heart! I love it too and I’m always on the lookout for efficiencies. I often fall down the rabbit hole myself and have found some really great assets along the way. Love a good script or action set.
Minor note on the symbols where you mentioned:
“When you create a symbol from text, it changes the text into a vector graphic.”
Actually it does not. The text remains editable. You can either break the symbol to edit text or you can edit the symbol itself if you like but then it changes all the instances too. It will only become vector and permanent if you expand the text. I also like that it keeps me more consistent in using the same font settings though there’s always character styles instead too.
I love that there’s always a million ways to do any one thing in illustrator. Sky’s the limit. <3
That’s good to know! I’ll definitely have to play with symbols again when I’m working on another pattern. I use character styles quite a bit but that is an InDesign habit. 🙂
Oh gosh! You just save my life! Today I was buried under piles and piles of hand drawn patterns and I was so afraid to jump into vector drafting. But, I am used to Illustrator, I just didn’t knew it could save my life like this. wow! thank you so much!